假期真的是太闲了,鸽了好久的搭个人博客计划启动~~
还是用最简单的github homepage+Hexo搭一个凑合用吧。。。细节我就不详细写了,照着这个步骤就差不多了Footnote【1】
我是在自己的WSL上搭的,所以基本参考使用linux博主的过程就ok了
此处记录一些bug以及解决方法:
创建myname.github.io项目,配置ssh密钥,链接github
出现了报错,无法连接ip和端口
ping github.com拼不通
尝试解决:打开C:\Windows\System32\drivers\etc\hosts,发现:确实没有github.com的解析
在文件末尾添加如下内容,并保存:
192.30.255.112 github.com git
185.31.16.184 github.global.ssl.fastly.net
重启cmd窗口,继续ping一下github.com:
/mnt/d/1A/WorkNote/ —> ping github.com
PING github.com (192.30.255.112) 56(84) bytes of data.
64 bytes from github.com (192.30.255.112): icmp_seq=1 ttl=39 time=199 ms
64 bytes from github.com (192.30.255.112): icmp_seq=2 ttl=39 time=202 ms
64 bytes from github.com (192.30.255.112): icmp_seq=3 ttl=39 time=200 ms
64 bytes from github.com (192.30.255.112): icmp_seq=4 ttl=39 time=199 ms
^C
— github.com ping statistics —
4 packets transmitted, 4 received, 0% packet loss, time 3003ms
rtt min/avg/max/mdev = 199.580/200.422/202.086/1.084 ms
说明,本机已经能够正常解析github.com这个域名了。
ssh 连接不上github
em,回上海之后,迷一样的可以了。。。
配置设置
编辑_config.yml文件
deploy:
type:git
repo:git@github.com:BlingArida/BlingArida.github.io.git
branch:master
设置主题
https://github.com/theme-next/hexo-theme-next
1 | git clone https://github.com/theme-next/hexo-theme-next themes/next |
1 | hexo -d |
报了一个错:
Connection closed by 192.30.255.112 port 22
fatal: Could not read from remote repository.Please make sure you have the correct access rights
and the repository exists.
FATAL Something’s wrong. Maybe you can find the solution here: https://hexo.io/docs/troubleshooting.html
嗯,所以我在_config.yml里把git换成https了,然后搞定了
站内搜索功能的实现
首先,我们在终端进入blog的根目录下,执行以下命令,注意这两个都要安装:
强调一下,这里我们要实现的是全文搜索,之前看教程只装了下面那个,折腾半天搞不定站内全文搜索,只能检索标题mmp。。。
如果这个破搜索抽风的话,就去blog目录下删node_modules这个文件夹,重新执行这几步插件的安装
https://www.itfanr.cc/2017/11/24/resolve-hexo-blog-search-exception/
1 | npm install hexo-deployer-git --save |
接着,我们进入站点配置文件_config.yml,在最后新增以下内容:
#content 默认是true,即支持全文搜索
1 | search: |
最后,打开主题配置文件_config.yml,搜索local_search,其值改为true:
1 | # Local |
为文章内容添加统计功能,文字总数+阅读时长
这个功能在next主题中已经存在了,我们只需要打开开关就行,具体步骤分为下面三步:
终端进入blog根目录,执行下面代码:
1
npm install hexo-symbols-count-time --save
进入站点配置文件,为blog配置统计功能,将以下代码复制到最后:
1
2
3
4
5symbols_count_time:
symbols: true
time: true
total_symbols: true
total_time: true进入主题配置文件,搜素
symbols_count_time,然后把要显示的改为true.
更深入的操作大家可以看github上的说明。
PS:如果大家配置完成,然后检查无误后,打开页面依旧没有显示,shift+F5).
添加版权信息
编辑next/_config.yml
1 | creative_commons: |
设置favicon图标
1、选择一个favicon制作网站完成制作,例如:比特虫 ,制作一个1616,一个3232的;
2、两个不同尺寸大小的文件,重名为favicon-16x16-next.png和favicon-32x32-next.png;
2、将重命名的两个图片文件放到博客目录下的themes/next/source/images中(覆盖原来的两个默认的)
图片设置
hexo支持它的myBlog/source/images里的图片上传
在typora设置
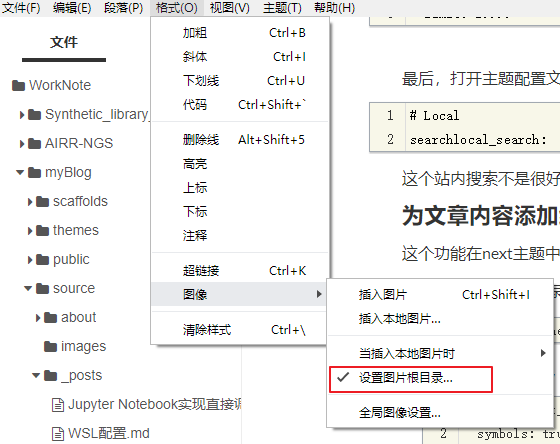
设置好了之后,typora的开头会增加一行
1 | --- |
这样就可以愉快地直接本地和推到git上查看图片了
字体设置
编辑next/_config.yml
1 | font: |
觉得字体略大
编辑myBlog\themes\next\source\css_variables\base.styl
1 | $font-size-base = 12px; |
还想加进去的功能
- 增加评论功能
- 设置一个萌系(?)头像
- 发现基友的网站都能插入视频了,em下次再说
- 优化百度、谷歌搜索到博客,其实这个最重要。。。emmm,先鸽。。。
FootNotes
https://hexo-guide.readthedocs.io/zh_CN/latest/theme.html
https://theme-next.org/docs/theme-settings/#Fonts-Customization